After days of practice, I decided that Friday was the day to finally try my free-motion "skills" (?!) by stippling on a real quilt. What a disaster! Everything I've come across (web, books, videos, classes) says to practice like crazy on a small (12" - 24") faux quilt sandwich. But that didn't prepare me for how the weight of a quilt, albeit a small (lap-size) one, would resist moving. Even with my Magic Genie bobbin washer, Supreme Slider and Machingers,* I ended up with tiny stitches and total lack of control over where my stitching was going. I am so NOT going to show a photo of this!
 | ||
| Quilt back; knot was in the brown area |
 I was so upset about this that I dreamed about it that night. But at least my subconscious brain figured out what I'd done wrong. I plan to incorporate some cursive text in the stitching on the horizontal sashes. So I started stippling on the vertical sashes to avoid tackling the text for the time being, and failed to begin in the middle of the quilt (where the text would be). I knew better -- everyone says to start in the middle. But I guess my enthusiasm overpowered my common sense. So, my [very] bad on that. Never again! Measure twice, cut once. Think twice, stitch once!
 | |
| My darning/free-motion foot |
Taking it to heart
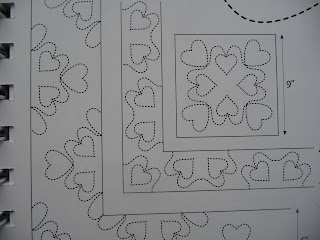
The stippling I think I can now handle. Not great, but acceptable. I plan to transfer the text or guidelines to the sashing in some way. The intersections are a bit of a challenge, though. I've decided to put a heart where the stippling in the vertical sashing meets the text in the horizontal sashing. The heart shape is wonderful for neatly ending a line of stitching that's not on an edge, since it has two closing points (top center and bottom point). It's also perfect for incorporating changes in direction (like the sashing intersection). And they are easy for the beginning quilter -- you don't have to retrace any lines.
 |
| Heart Strings |
 | |||
| Hearts Around |
I marked hearts on a practice square, but I couldn't see what I was doing. The "hearts" ended up as some really weird, skewed shapes. What I've figured out is to define a square where the heart will go (such as the sashing intersections), mark the vertical point where the heart will center (about 1/3 of the way down the square) and the vertical point where the curve of the heart changes (about halfway down). Then free-motion away.

I tried all this on the other vertical sash, and it seems OK. You may be able barely to see the original basting in this photo. If I could have left it in, there wouldn't be all that marking to do. But of course, quilting over the basting stitches wouldn't be too bright.
Unfortunately, since the stippling was more open (a.k.a. successful) on the second try, I had to go back and rip out everything else that I did on Friday. Just as well, but some of the stitches are so tiny, I had to use a needle (not a ripper or even a pin) to get them out. Several hours' work, but quite an impressive learning experience! I promise I'll post the finished product. Really, I will!
* I show you these in my next post.
No comments:
Post a Comment