Monday, June 25, 2012

Cooling Down

Summer started HOT here in the northeast.  Sewing in a south-facing room just wasn't going to do it.  But I wanted to be caught up before leaving again for the cabin in Michigan.  Once the heat wave broke, I finally got around to putting together the blocks for the most recent round of the Barrister's Block Sow-Along.

Flock of Geese

HSTs in two sizes.  Weird fabric selection, to be sure -- Civil War, paisley, modern floral and a floral from the 1980's.  Talk about scrappy!  The blue in the large HSTs pulls together the various prints.  This block is also in the Farmer's Wife book.
Flock of Geese


Clay's Choice

This is a simplified version of a classic block.  In most versions, this is a standard four-patch, with the corner squares in a different fabric from the rest.  Here, the corner squares are also made of background fabric, so there are rectangles instead of two squares.  I'm not sure about this one; might make it again in three colors.  But I like the fan effect.

The background is the same fabric that I used for the curtains at Otsego Lake; the dark red is a Civil War reproduction fabric.  A little something for everyone!
Clay's Choice
Anvil

And here I really dug into my stash.  The background is something that I picked up who-knows-when and had lots of squares already cut.  It's a nice, solid fabric but it frays like crazy!  To be honest, I doubt that it is actually 100% cotton.  The brown came from that big bag of fabric that my friend, Eileen, gave me a few week ago -- nice print but very thin.  And the center square is an Asian print with teal and gold.


I'm off to the lake cabin in two more days!  Have decided to change course, quilting-wise, and take along a couple of projects that have been tucked away for a long time and that don't require the precision of the Barrister's tiny triangles or the accuracy of the Civil War Block Swap.  The little Singer should be just fine for what I have planned.  We'll see!

Saturday, June 16, 2012

Two Little Blocks

It's been a busy and productive week -- lots of sewing, even more cutting, and a little bit of construction work.  So beware, this is a long post!  Here's a hint of things to come...

Two Blocks, Twice

The Barrister's Sow-Along blocks are small (6-1/2" unfinished), and the little triangles still give me some grief.  Both of last week's blocks had triangles that finished at 1", and I ended up making both blocks twice because I was unsatisfied with the first results.  Both blocks come from a book by Lori Smith.

XQuisite

These are the "directions" for making this block:
It took me a while to figure out how to sew the triangles on the corners.  So I thought I'd show you how it goes together.

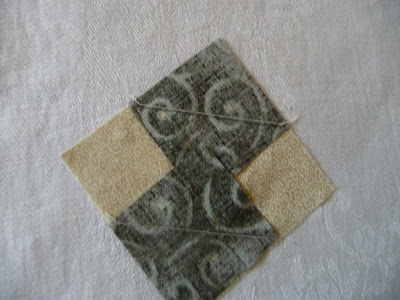
Cut the small dark squares on the diagonal.  Sew each pair of squares onto a larger background square.  This is like making Flying Geese, except that you sew on the sideways diagonal instead of the long way across both small squares.  The trick is to sew just a thread or two inside of the diagonal line.  This allows for that tiny bit of fabric that gets "lost" when the squares are pressed back.


Carefully roll each small square back on itself with your iron and press, making sure that the loose edges of the squares align with the background square.

Now trim the seams, cutting off the small triangles on the outside corners of each square.  Technically you don't really have to do this, and the cut pieces are too small to use for anything.  But trimming off the seam means you won't have to sew through two extra layers of fabric when you join the units. 
Line up the seam with a quarter-inch line on a small ruler -- easy!

 Square up the completed unit, making sure you align along a seam line before you trim.

The first block that I made of this pattern, I stitched too far in from the diagonal, and nothing fit properly after that.  Here's what it looks like when it's right!

This is the completed block.  Since you pressed the small (dark) squares back on themselves, the seams will automatically face away from each other so that they can be easily nested.

Flutter Wheel

Again with the 1" triangles!  The pattern was easy to follow, but there's not much room for error!  The dark and background fabrics start as 2" squares.  Like XQuisite (above), this one is done scrappy, using 5 different background fabrics and 5 different darks. 

Put a light square and a dark square right sides together.  Sew each pair of squares to make 2 half-square triangles (I stitch a quarter-inch on either side of the diagonal and then cut along the diagonal to make the HSTs, but there are other ways to do it).  The medium fabric is four 2-1/2" squares (those are the BIG pieces!).  Good thing these are sewn together yet -- somebody's out of place!

HSTs are sewn, 4 in each color combination.


Keeping the colors together for each fan unit, sew two pairs of HSTs together, dark-to-light, to form a rectangle and press toward the dark side. 
HSTs are sewn once to make rectangles (half of a fan unit)

Flip the rectangles together, right sides together, nesting the seams to get nice points in the center of each fan unit.

Nest the seams
Sew the units together according to the picture.  I usually sew the vertical seams in each row first.  There aren't any seams to match at this stage :-D

Rows are sewn -- almost done!
Sew the rows together, nesting the seams and matching the points where the seams meet.  Most quilters that I've met so far don't use pins when they sew.  But I prefer to use them for these final seams, to make sure that everything that is supposed to match stays together.  I pin the rows together just ahead of the matched seams, removing the pin just before the needle gets there.  I was so happy when I got my first machine that would sew over pins!  Now I have an electronic machine and I'm told that sewing over pins can ruin the machine.  Drat!

Sewing the rows together
This is the final block.  The center fan is mighty wonky, but at least the points in this block come together pretty well.
Flutter Wheel
This was the first version of the same block.  The only fan unit that came out really well was the one in the center.  Plus, I didn't much care for the color of the medium fabric.  It looked OK when I picked it out, but things just don't seem to hold together.  Maybe it's because o the heavily patterned background fabric in the bottom two fans?


A Design Wall at Last!

You might remember the mosaic fireplace quilt that I'm planning.  I decided that I really needed to have a flannel wall to figure out the layout.  I'd already bought yards of flannel, so this week I headed out to Home Depot to look for a large piece of foam core.  Oops!  Forgot that I had the little sports car instead of the station wagon that day!  I ended up buying an 8-foot length of 1"-thick styrofoam and had the guy cut it in half.  Then I put the top down on the car and wedged the pieces into the front seat as best I could.  Almost lost it a couple of times on the half-hour drive home, but we made it!

To connect and stabilize the two 4-ft pieces, I taped cardboard along the seam.  Duct tape and the inserts from cases of wine!  Perfect!

The back of the styrofoam
 I also had to cut the flannel in half and seam it to fit the styrofoam.  After those 1" triangles, blowing through a 6-foot seam was actually fun!
The flannel awaits
I put the styrofoam on the flannel and wrapped it to the back, pulling and smoothing it as I went along.  I'd planned to staple it down, but discovered that my stapler doesn't open up!  The duct tape didn't stick all that great, so I used painter's tape as a temporary solution.  Looks kinda like the back of some of my quilt blocks!


Look, Ma!  Hospital corners!
 Just to see what they look like, I put all the Barrister's blocks up on the design wall.  Guess what?  When they are laid out like this and I stepped back to look, they look pretty good!  But I'm almost out of wall space already!
Barrister's blocks so far, including 3 sets of do-overs


Sunday, June 10, 2012

Christmas in June!

Look what I found when I opened the front door last night!  My friend Eileen said that she'd drop something off, and here it was!

Eileen is very creative and very good at anything she does.  She did a lot of sewing for a while, but has moved on to oil painting.  So she decided to gift me with a bag full of fabric!


 A few pieces were "re-gifted" and probably can't be used for quilting.  The two below on the left are upholstery fabric and the one on the right is a shiny cotton-poly blend.  I'm sure I'll find a way to use them, though!
 The rest was just too amazing!  Orange!  Purple!  Gold!  Blue! Red!


 Some pieces were just a couple of inches long and less that a fabric-width wide.  Others were a full yard!


 All the side edges were serged.  I don't know where Eileen got the fabrics, but I suspect she serged them herself.  Even around the corners!


Some fabrics just cry out to be used in an art quilt.  I can imagine using a metallic thread to quilt around the trees and leaves in these fabrics.  Of course, for the time being, imagining is all that's going to happen!


My favorite quilting blogger, Bonnie Hunter, has come up with a whole system for cutting small pieces of fabric into sized scraps so that they are ready to use in a scrappy quilt.  I've finally gotten far enough along to have a fair amount of scraps, so I'd spent the day trimming and sorting.


 Eileen had been making a landscape quilt, so little pieces were missing from many of the fabrics.
The only way to go was to trim up the fabrics into larger pieces and then to cut the remainder into smaller squares and rectangles.  Step One was to trim off pieces that had already been cut into.
 Fortunately, there was some selvage on almost every piece, so I was able to line cut edges up along the grain.
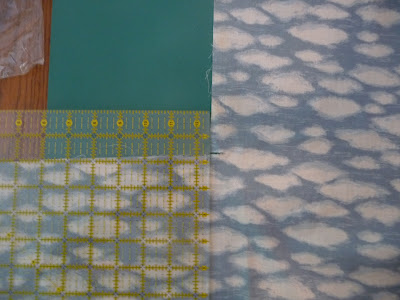
 The next step was to square up the entire piece of fabric.  In this case, I had to use three rulers to get everything in order.  The little one on the left is lined up with the selvage edge.  The 12-1/2 inch ruler carries the square across the fabric and the third ruler is long enough to trim up the edge.
 As you can see,  there was still some squaring-up to be done.
 Finally, all the fabrics had been trimmed.  I cut the extra bits into strips, rectangles and squares.  Small pieces became squares, mostly 2-1/2".  Any pieces less than 12" long were sorted by width and then by value and stored as rectangles.  These might later be used as rectangles or cut down into squares, depending on what need arises.   Really small pieces just went into a bag to be used as leaders/enders when chain-piecing.  Pieces 12" or longer were considered strips, which could also be cut down, but might have additional uses, such as sashing or a pieced border or binding. 
  Sorting out the rectangles by width:
 Squares by the bag!

I think this effort will all have been worth it.  My big projects, like the Otsego Lake quilts, are all planned out, but for the Barrister's Block quilt-along I'm increasingly turning to a scrappy look.  There's certainly plenty to work with now!


Wednesday, June 6, 2012

Odds and Ends

Time to start a new project and stitch away at my sew-alongs.    For the new project I'm debating between (a) a Halloween applique table runner that's partly started and (b) the fireplace mosaic quilt that I showed you earlier.  The calendar says (a); my heart says (b).  Maybe I'll start the fireplace and take the applique with me when I return to the lake in a few weeks...

Fifty-four Forty or Fight

This is the May block in the Simple Sampler BOM at PQ.  This time the finished block will be 12" (the first one was 9").  It'll be really interesting to see how we put all these different-sized blocks together.  For this block I used the Tri-Recs rulers that I got a year ago but have never used, mainly because I haven't had (or at least recognized) any blocks that they'd apply to.

Fifty-four Forty or Fight


I had to swap out the white fabric that I was given for some in my stash because I cut it wrong initially.

I sewed this on the little machine in Michigan, so the seams are a little big and the block is just a little small.  Not enough that it couldn't be fudged, except that two of the points are right up to the edge.  Guess they'll just be a bit blunt when the quilt is finished.

This is the biggest block I've ever sewed -- what a treat after all those tiny HSTs in the Battlegrounds block!

Bonus Blocks from the Barrister

Randi from the Barrister's Block Sow-Along posted two bonus blocks last month.  The first one was a Battlegrounds variation which I've learned is called Gray Goose.  The units are the same -- 16 scrappy HSTs -- but they are arranged differently.   The little Singer came through on this one!
Gray Goose


Most of the dark fabrics came from a bunch of 4" precuts that I'd picked up on sale.  There was waste from cutting 2-1/2" squares from these, but the remaining fabrics in each set weren't my favorites (I'd already used those!), so I didn't mind.  The gold batik and the dark greens came from the new fat quarters that I'd picked up in town.


Lemoyne Star

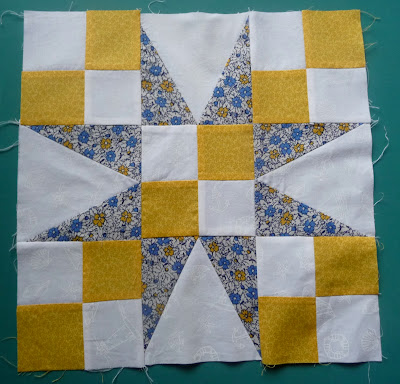
The second bonus block was a Lemoyne Star variation.  I did the HSTs at the lake, but finished the block at home.  The final block is really disappointing.  I don't know if it's because of the different seam sizes or what.

The good news is that Randi is only giving us two new blocks this week, so I should have time to make another one of these.


Civil War Block Swap!

I couldn't resist!  The ladies at Pieceful Quilting are doing a Civil War Block Swap.  Everyone who participates will make 12 identical Double Monkey Wrench blocks using only Civil War reproduction fabrics..  We'll turn them in at one the two PQ shops by September 1 and a week later we'll get 12 blocks, all different fabrics from different quilters.  We'll get instructions to piece the quilt top (I think there will be sashing involved) and then have a Big Reveal party in November.

Double Monkey Wrench

 I was concerned that my blocks wouldn't be good enough, but it's an easy block.  No point-matching, just linking up seams, which is one thing I can do.  But quelle horreur!   Just as I was squaring up the last side, my hubby stuck his head in the door and surprised me.  The ruler slipped!  Ack!!!!

If this were just for me, I'd fudge the seam when I put the quilt top together.  But I can't turn this one in!  Guess I'll run back to the shop and pick of fat quarters of two blue fabrics and replace the corner HST.  Grrrr.


Sunday, June 3, 2012

Peconic Quilt Show 2012

Home Again, Home Again


Foul weather in Baltimore left me stranded in Detroit overnight, but I arrived home yesterday at noon, just in time to grab a peanut butter sandwich and head to the Eastern Long Island Quilt Show 2012.  It was in three buildings at an area community college -- fun!  I learned my lesson from the last quilt show and took my real camera with me this time.  Herewith, photos from building #1, the exhibit hall.

 Loretta's Garden

This beautiful appliqued quilt won first prize in the "Applique Large" category.  It was one of the first quilts you'd see as you walked into the exhibit building.  Though I admire applique more than I actually want to make something like this, there's no question that this deserved its prize.  It was a very large quilt (~ king size).  Not only was the stitching flawless, but the use of color and attention to detail was just astonishing.

Loretta's Garden by Marie Nigro

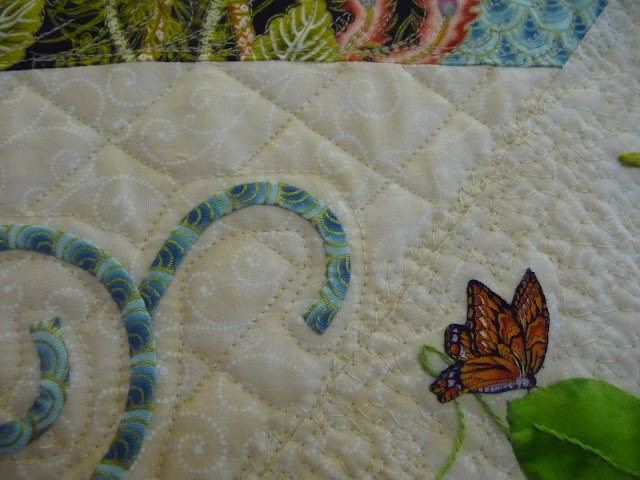
Look at the beautiful embellishments, the dragonfly and the tiny ladybug, just about life size.  You wanted to put her on your finger and say "Ladybug, ladybug, fly away home..."  See the butterfly in the next one, too.


 Different quilting techniques were used in different areas, even in the same fabric, to add texture and highlight different parts of the quilt.  It's machine quilted (I'd love to see the back!).


 Round Robin

There were eight round-robin quilts done by members of one guild.  Each member created a center block, then passed it along to the next person, who added a border, sent it to the next person, and so on.  The original quilter then bound and finished the quilt.  I only took pictures of two of them, but you can see how gorgeous they are!


Purple Serenity by Cathy Barta
Three of the Material Girls' quilts won a prize, and three got an Honorable Mention.  I'm glad I didn't have to judge these!

Surrounded by Friendship by Pat Bandura
Civil War Quilt

I love the colors in Civil War quilts.  This photo doesn't quite capture how gorgeous this was!

Civil War Tribute by Sharon Chimento


Here's a close-up of one of the corner Bear's Paws.  This quilt was quilted in a more open pattern than most of the quilts.  I like the curls that kind of balance out all the sharp points of the triangles in the blocks and outer border.


Fireworks!

Although I prefer muted colors to primaries, this one was amazing.  As you can see, it won a first prize (in the Pieced Large category).  Doesn't it just look like bombs bursting in air?  You can almost hear the boom and see the bright stars raining down.

Fireworks 4th of July by Beverly A. Delaney

And Now for My Favorites!


Here are the quilts that I  particularly enjoyed for strictly personal reasons -- just something about each one struck a chord with me.

Strings

This quilt was intriguing, because it combined strings of scraps with black triangles that gave it an Amish look.  The concept is very simple, but it's really eye-catching.  This gets my personal Honorable Mention.

Almost Amish by Paulette McDonald

O Tannebaum!

My Third Place award goes to this wonderful Christmas tree made out of teeny-tiny log cabin blocks.  This was a small-ish quilt, maybe 18-20" high?  Ten rows vertical, so each block was max 2".

Log Cabin Christmas by Barbara Downs
And look at the size of the strips in the blocks.  I'd guess that each one is half an inch, finished.


Moonstruck


I love mosaic quilts, and this one was really different, so it gets my personal Second Place award.   (Besides, Moonstruck is one of my all-time favorite movies).   It's not a true mosaic, but is made up of a bunch of different 9-patch blocks.  Squares from fabrics used in the blocks make up the outer border.  Each cat is quilted differently, so even the three black ones look a little different.

Moonstruck by Roberta Garris


This is a closer view of the sky area.  How cool is this quilting, with all those twinkling stars!


 TA-DA!  First Place!

Should Da Been Candy by Alice Hasselback
 Whaaaa???  Why this one?  The fabrics are pretty, but what's so special about this one?  Read on...


Ha! Ha!  Gotta love this girl!  Not only did she ignore the whistle from the Quilt Police, but she entered the quilt in the show!   You can see that if those colored do-dads in the light background areas were turned, so the points met the corners of the four-patch squares, they would look like a twisted candy wrapper.  So what?  Kudos to Alice!