Sunday, December 23, 2012

Easy Street Part 2

Purple Flying Geese!


Step #2 of the Easy Street Mystery Quilt is to make flying geese with the purple and black-and-white fabric. 
 
Usually I use the No-Waste method to make flying geese (shown at the end of this post).  But since I had already cut [lots of! too many?]  2" strips of the black-and-white, I decided to follow Bonnie Hunter's recommendation and use a pair of specialty rulers to cut the pieces for these units.  I already had one of the rulers, so I went flying (ha, ha) to opening day at the new Pieceful Quilting store to get the other one.  If I used the No-Waste method, I'd have needed odd-sized squares to achieve the same size flying geese units.  Plus, I wouldn't have had an excuse to go to PQ (as if I needed one).

Cut Those Geese!


The first step is to cut the quarter-square triangle "geese" pieces using the Companion Angle ruler.   It creates equilateral triangles, the same as if you quartered a square.  The top of the ruler is flat, so you end up with a nice, even line across the top of the flying geese unit (no dog ears).

Sorry for the glare in these photos.  Too gray and rainy to avoid using the flash!

Line up the ruler along your strip (see that the bottom line is at the 2" mark and the top is even with the top of the fabric).  Line up the left edge so that you cut off the selvage.  I'm saving the little triangle pieces -- you never know!

By the way, you might notice that there is some extra fabric peeking out on the left in this photo.  This wasn't a first cut, and my cutting had gotten a bit off, as it usually does after half a dozen cuts or so.  It was time to even up that edge for a more accurate cut.


Next, turn the ruler to the right.  Don't flip it, just rotate it 180 degrees.  Now you're ready to cut the next piece.


Just keep rotating, cutting, rotating, cutting, with the occasional correction every couple of pieces.

 You can layer your strips to cut up to 4 strips at once.  I only did two at a time.  Even with a fresh blade (which this was not), the bottom layers seem to get a little weird.  This is one quilt I don't want to mess up!


Wing It!


Next up, use the black-and-white (or whatever you're using) 2" strips to cut half-square triangles.  There are plenty of rulers you can use, or you can just cut 2" squares in half corner-to-corner.  As with its, um, companion ruler, the advantage of the Companion Angle ruler is that it is marked so that you can cut the triangles flat on top, without dog ears. 


I started with the ruler wrong-side up.  No matter.  The technique is the same as with the Easy Angle ruler -- cut, rotate, cut, rotate, correct...


Here's the key difference:  With the quarter-square triangles, you can layer your fabric for cutting any way you want -- right sides together, right sides up. 


But with the wings, you need to be sure to keep the right sides of the fabric together.  This is because you want to cut pairs of right and left wings for each flying goose.


Stitch the wings to the geese.  I chain-stitched the left wings first.  Press them open, seam toward the purple goose, then chain-stitch the right-side wings.

 Voila!  Purple flying geese with nice, even tops.  Just clip the dog-ears off the bottom and even up to size (2" x 3.5") if necessary.


To see master teacher Bonnie demonstrate the technique, she has a nice tutorial on her blog.

As with the 9-patches in Step 1, I didn't try to make all of these units at once.  I made units out of one strip of each purple fabric I had on hand.  When the mystery is revealed, I'll put the blocks together with the units I've made.  Then I'll decide how big I want my quilt to be.

Stay tuned for Step 3, which brings in the blues!  Mmmm.

The No-Waste Alternative Method


 As I worked through these units, I came to prefer this method with the Easy-Angle and Companion Angle rulers over the "No-Waste" method that I'd been using.   Even though there is some waste (those little triangles at the ends of each strip), it's easy to see that things are aligned with those flat tops on the triangles.

With the No-Waste method, you're sewing squares rather than triangles.  Even though you're still sewing along the bias, and you have to take time to draw lines on the wing pieces, I have somehow felt more confident with this method.  (Not to mention that the projects I've worked on with flying geese have specified measurements to use this method).

No Waste Flying Geese Quilt Pattern
There are a bazillion tutorials out there; here's one: http://quilting.about.com/od/quiltpatternsprojects/ss/No-Waste-Flying-Geese-Quilt-Pattern_2.htm


Ironically, as I was putting together this post, I recalled that I also have in my ruler-stash a ruler called the Flying Geese x 4 No-Math Ruler.  I got it for my very first quilting class and never used it again.  I went back and reviewed how to use it, and discovered that it is actually the No-Waste method.  The nice thing is that you don't have to stress about cutting on the 2-7/8" line (or whatever).   You just cut your fabric according to the finished size of the unit by following the lines on the ruler.  Here's a tutorial on using the ruler

Tuesday, December 18, 2012

Easy Street!


Mommy, where do UFOs come from?

No, this is just part of the pile of UFOs!

Let's see, I have
  • 4 Christmas gifts to finish* (but realized I have another one that's not even started!)
  • 1 completed quilt that just needs a label
  • 1 quilt basted and ready to quilt
  • 1 quilt top finished and waiting for a back
  • 1 quilt top pieced and waiting for borders
  • 3 blocks for my Simple Sampler class not even started (there would be 4 except that Hurricane Sandy flooded out my LQS)
  • 6 Barrister's Blocks cut and ready to sew
  • 5 Barrister's Blocks that I haven't even selected the fabric for (and 3 more coming tomorrow)
  • A large container filled with quilt kits, both purchased and self-made
  • 1 knitted infinity scarf 3/4 completed
  • 1 needlepoint project barely begun
* These were the headrest totes and CD holders that got done in time for my trip to Memphis, but while I was packing, I discovered that I'd completely neglected to make another gift that I'd planned.  Ack!

So where to start?  Of course!  I've decided to make the new Bonnie Hunter Mystery Quilt!  It's called Easy Street, and I just couldn't resist!  You can follow along by clicking on the link on the sidebar of this blog.

Easy Street Mystery Quilt


I love Bonnie Hunter's blog, her quilts and her attitude.  If you aren't familiar with it, check it out -- free tutorials, quilt patterns, so much cool information and photos!  I've learned so much just from poking around in her website, so I really wanted to take a class from her.  But at this point that doesn't seem possible.  She is totally booked into 2015, and none of her classes are anywhere near me.  So when she announced that this year's Mystery Quilt, I was interested.  She calls it Easy Street because it's less complicated that some of her previous projects.  OK, I'M IN!

A mystery quilt is one that you work on without having any idea what it's going to be when you're done.  This is my first mystery quilt, and it's a little scary.  The fabric requirements only say the total amount of each color that you need, but don't say anything about a minimum width or length.  The more scraps you use, the more uncertain whether you have what you need.  Since I ended up having to buy most the fabric for this quilt, it should be OK.

She's using black, white and gray as background and purple, turquoise and lime green for the color.  I guess I could have used more of my stash if I'd used different colors, but I love these!  Here's what I ended up with:


I can't find the photo I took of these fabrics before I cut them.  Too bad, they were all fat quarters or yardage and some were almost too nice to cut (see the big dogwood flowers?)

I was careful to select fabrics that are mostly white, so the units wouldn't be too dark.


I like these colors so much, but I had very little in my stash, mostly purples.  When I started quilting, I was using mostly baby fabrics, then was drawn to a more muted palate (like the Civil Was fabrics).  And I'm not [yet] into modern quilts.  But this was a chance to use these pretty fabrics.


The Disappearing 4-Patch!


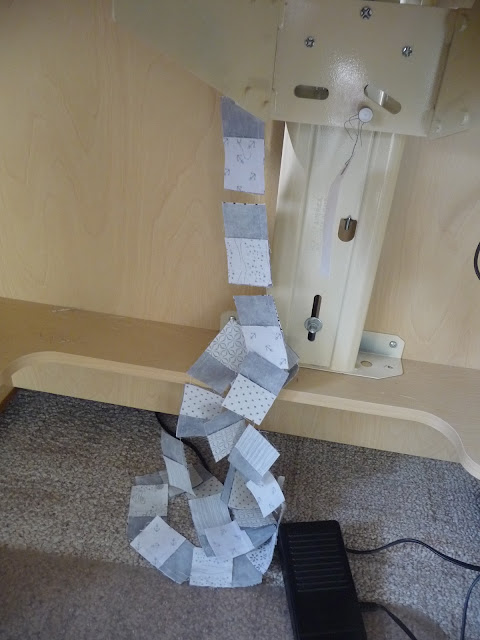
Step #1 was to cut the gray and black-and-white into 2" strips.  Piece of cake with the Shape Cut ruler!  Strip-piece, cut each strip into 2" pieces and stitch up 4-patches.  So why do I call this the Disappearing 4-Patch?  I chain-pieced the patches in groups of about 30 (one strip per B/W fabric pattern). 


So where are they?  They disappeared!


Peek-a-boo!  I see you!  Down on the floor under the sewing table!


This is why I'm climbing the walls waiting for the acrylic insert for my sewing table!  It took two months to come in the first time, and then it was the wrong size.  So I still have the machine extension table in place and that gap behind the machine.


Another question mark in a mystery quilt is just how much to cut for each step.  The directions say you'll need a certain number of each piece or a certain number of units, but when you're using assorted scraps plus yardage and FQs, it can be a bit of a challenge.  Anxious to get started, I didn't methodically figure out how many pieces I'd get from a WOF (width of fabric) strip.  In fact, I got a bit overenthusiastic and cut 2" strips of all the gray and almost all the black-and-white.  If I'll need something wider,  I could be in trouble!  (Or back in the fabric store, LOL!).  Lesson learned: I should have cut just one strip of each color, sewed it up and made the 4-patches, then calculated how many strips I'd need for the first step.

Step #2 is to make flying geese with the purple.  That will be my next post.


Tuesday, December 11, 2012

Christmas Road Trip!

Time to take a break from all the blocks-of-the-week/fortnight/month!  Time to just stitch up a couple of little projects.

Headrest Totes

My two grandsons, ages 3 and 6, are headed from Memphis to Miami for Christmas (with my daughter and SIL, of course).  Everyone's going to need some distraction!  The other day I pulled some scraps and whipped up a couple of little bags to hang over the headrests in the car to store toys and books during the journey.

I still have to stitch down the "handles" that slip over the headrests, and haven't quite figured out how to enable the 3-year-old to reach his bag.  The strips I used for the handles are actually a bit long, so I think I'll just leave one end flapping in the breeze.  He can reach it with this foot and grab it to get at his stash.  Things were so much easier when we were left to create havoc and risk bodily injury in the back seat.


 CD Holders

So while I was making the headrest totes for the boys, I decided to make some car visor CD holders for the grown-ups.  I found this pattern a while ago at http://pukingpastilles.com/?p=517.

You can make it almost entirely with scraps.  Cut either 22 4-1/2" by 6" pieces or 11 9" by 6" pieces.  Half will be the back of each CD envelope and won't show.  You'll also need a couple of longer pieces for the backing and some seriously stiff interfacing.

Guy colors
Girl colors
For the "envelopes" I cut the smaller pieces and sewed them together.  In retrospect I think it would be better to use the larger pieces and just fold them over -- no pesky seam along the top of each edge, no ironing the seams.


The pattern calls for a stiff fusible interfacing (I found some at Joann fabrics, not exactly what the pattern called for, though).  Fuse one backing piece to the interfacing.  Then align your "envelope" pieces according to the pattern and stitch them down, one at a time, along the width of the interfacing.  I recommend switching to a sturdy (No. 14 or 16) needle for this.


One problem I found was that the long, stiff interfacing wouldn't fit under my machine when I sewed the first piece on.  I had to turn it around and negotiate the 1/4" seam.  I'm used to using the right side of the foot as a guide, so it was a bit awkward.  After the first piece it was fine.


After you've sewed all the pieces on the front, fuse the backing piece to the other side of the interfacing (talk about using up your scraps; ugly works here!)  The interfacing I found was fusible only on one side, so I dragged out my roll of Stitch-witchery to fuse the back.  Then sew a couple of strips of elastic to the back.

I found that the positioning of the elastic in the pattern instructions wouldn't work for my car, and I have no idea how it would work in my daughter's or son-in-law's cars.  So I just guessed...  (insert crossed fingers here!)

The last step is to bind the edges.  I just used double-fold bias binding that I picked up at my local Ace hardware store!  Shop locally is my motto! 
There's nothing elegant about these, but they were fun to make and I think they will be useful.