Tuesday, August 28, 2012

Kaleidescope Adventure Begins!


I've just started a new class, One Block Wonders, at Pieceful Quilting.  I missed the first class because I was traveling back from San Francisco, so I'm just winging it. First, though, catching up with the Barrister's Block...

Barrister's Block

Way behind -- I missed the entire month of August!  So far I've caught up with the first 3 blocks.

Handweave

This one came out great.  No triangles (or, for me, tri-mangles).  Not very sexy, but nice.


Missouri Star

I love this block.  I am a big fan of the Missouri Star Quilt Company and was delighted to make the block, even though the little duck wasn't there to quack.  I love the dragonfly print in the center, which I picked up during the Shop Hop last month.


Boxes and Baskets

What is it about the red/white/blue blocks that always get messed up?  I think it's because I use muslin for the background.  This block required some easing around the center unit and the background rectangles.  Came out OK (sort of), but lots of wrinkles.  If you could see this in 3-D, you'd know that it would make a great baseball cap.  Nothing flat about it!

Kaleidoscope Quilt

I couldn't wait to tackle The One Block Wonder.  It's a kaleidoscope quilt.  It's gorgeous and really not difficult (except that it's all triangles, and I still don't sew these very well).  But I missed the first of the two classes, where they explained how to pick out fabric and cut it and arrange it.

The Fabric


I couldn't find anything at my LQS (Pieceful Quilting) and (sigh) ended up at Jo-Ann.  Found an autumn floral that I thought would work; now I'm not so sure.  And since I was at Jo-Ann, I didn't get the advice I needed, so I ended up with not-quite-enough-fabric.  I ordered another yard on line (even though they say NEVER to to that), and sure enough, that added to the problem.  Upshot:  I don't have as many triangles as I should have.  But guess what  -- I'll figure something out!

The book we are using in the class is One-Block Wonders by Maxine Rosenthal (C&T Publishing).

This is the Bible!
 I wanted a large repeat in the pattern.  This was the best I could come up with on short notice.  The first thing to do is to identify the horizontal repeat (about 15" here) and the vertical repeat (about 24") and rough-cut swaths along the vertical repeats.    You should get six of the wide strips from your yardage (the book explains how to do this).


Cutting the Fabric


The biggest issue in the entire project (after selecting the fabric) is to line up the six wide strips to make sure that the pattern is "perfectly" aligned.  (I HATE that word!)  The idea is to cut six "perfectly aligned" triangles from each strip.  After aligning the wide strips, cut 3-3/4" strips.  Then use a  60-degree ruler to cut triangles from each of these smaller strips.
Align the ruler to just remove the selvage.

Cut along the edge of the ruler (sorry about the flash glare!)
 For us right-handed people, align a small ruler next to the left side of the triangle ruler; remove the triangle ruler and cut along the edge of the small ruler

 You end up with all these slightly wonky pieces from the end of each strip.  I've saved every one -- any ideas about how to use these???  Please let me know!

 Assembling the hexagons


For each set of six triangles, there are 3 ways to align them.  Maybe there's a secret that I don't know, but I needed to try out all the options to decide how to construct each hexagon.

Here's one set.  These three photos show all the possibiltiies from one cut:

Option 1

Option 2

Option
Pretty cool, huh?   Here's another set of triangles that include big sections of some of the orange flowers:
Option 1

Option 2
And other set with yellow flowers:

Option 1

Option 2

Sewing the Blocks


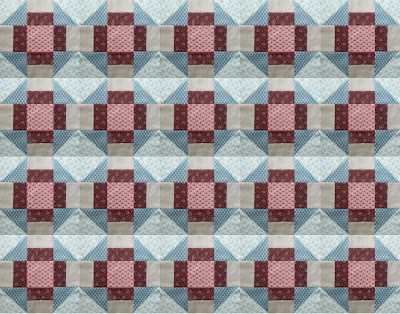
Next up is to sew things together.  The trick is to sew 3 triangles from each group together, making two halves of a hexagon.  In the next class we'll put the hexagon halves on a design wall to figure out how best to create a quilt.  This is the part that I'm worried about -- I think the colors here are too similar.  But it will be fun anyway.

Stay tuned to see what happens!

Tuesday, August 7, 2012

The Big Reveal!

So here's why I'm baking pies for my Dear Husband instead of sewing!


I've complained for a while that the computer desk I've been using as a sewing table just wasn't doing the job (though it seemed like a good idea at the time).  So when my local quilt store had some floor models for sale, I jumped in.  I emptied the files and other business-type stuff from the desk and then DH took over.  He managed to get the desk apart and wrestle the pieces out of the "study" (now known as my sewing room!). 

Goodbye, salmon.  Hello blue!

Then, bless his heart, he painted the room.   It was a hideous salmon pink (nice color, but not on walls!).  Now it is a restful blue/green/gray shade.  Bear in mind that the temperatures have been in the 90's, humidity the same, and no A/C.  What a guy!  Plus, he grills for dinner!

So here is the sewing cabinet, all closed up.  Small, tidy, very nice.  Much smaller than the computer desk that was there.

Voila!  It opens up into a nice, efficient space.  The machine is on a lift that can move up and down depending on one's needs.  There is a drop-down table at the back that opens up to support a quilt or to use for cutting. This will be a huge help as I continue to work on my free-motion quilting.


For the moment, I'll use one corner as a cutting area.  I was using the dining room table -- good exercise to wander back add forth,  but not very convenient.  Plus, I was always having to choose between quilting and entertaining.


I bought a mini-iron for those quick HST presses.  Still need to get a good heat-resistant pad, though.  My regular iron has an automatic shutoff -- I hope that this will be better for those stitch-and-press times. 


I'll have to wait a bit longer for the template that fits in to surround the machine when it is in the flat position.  But how nice to have it at a level where my arm is exactly even with the sewing surface.  Good-bye, carpal tunnel pains!  Now I can sew my brains out!


Meanwhile, I emptied out the old stereo cabinet as well (p.s., DH built that!).  It used to house all my non-sewing needlework (needlepoint, knitting, crochet, embroidery, etc.).  That's all in a new spot in some newly-emptied drawers, and my fabric stash that used to be in bins on the floor is now in the cabinet.


The one thing left over from when this was an office is the printer.  The cable modem and router are tucked into the cabinet, so the printer needs to be nearby.


Each bin is labeled, fabric sorted by color and size.  This system is sure to last at least 6 months, before (a) the stash gets too big, or (b) my organizational skills fail as usual.  I'm hoping for (a) but I'm not taking any bets!


Meanwhile, please don't open the closet door!  Batting, rulers, my mother's sewing baskets, miscellaneous tools and notions, fabrics that aren't 100% cotton, all flow out as if waiting for their turn to shine.


I'm off to California for a week, but I'm already itching to get back to my machine and sew!  Lots of Barrister's Blocks await...

Monday, August 6, 2012

Pennsylvania Dutch Peach Pie!

This weekend was the beginning of a major quilting-related home-improvement project and my DH came through way beyond the call of duty (more on that later!).  Since I couldn't (or he wouldn't allow me to) assist, I HAD to do something for him.  Summer on Long Island is a food lover's paradise, so I decided to make him a wonderful dessert!

The original recipe for Pennsylvania Dutch Peach Pie came from a good friend when we lived in DeKalb, Illinois.  The recipe was scrawled on a page torn from a steno pad (remember those?!).  I hope you enjoy this as much as we did!


Pennsylvania Dutch Peach Pie Recipe


Ingredients
1 cup sugar
2 large eggs
1 tablespoon milk
2 tablespoons melted butter
1/2 teaspoon cinnamon
1/4 - 1/2 teaspoon nutmeg
3-4 cups peeled and sliced peaches (about 1-1/2 lb)
1 unbaked 9" pie crust

Slice 3-4 cups peaches (about 1-1/2 lb.).  Blackberries are available at farm stands and pick-you-own places now, so I replaced one cup of peaches with one cup of blackberries.
Local peaches and blackberries -- yum!
 The peaches are so ripe, they didn't need to be blanched; the skins just slipped off.


The original recipe calls for mixing the spices with the custard, but I prefer to add them to the fruit; they seem to be more evenly distributed.  I like a lot of spice -- 1/2 teaspoons each cinnamon and nutmeg; you might want to cut back a bit.


Add two eggs to another bowl.


Whisk the eggs with 1 tablespoon milk and 2 tablespoons melted butter, then add one cup of sugar.  This will be your custard.


Put the fruit in a prepared pie crust.  I usually make my own, but this time I used a (thawed) frozen crust.  Works for me (I rarely eat the crust), but the pan is smallish, so the custard overflowed.  I like to line a cookie sheet with foil and put the pie plate on that -- definitely the way to go if you use a frozen crust in a wimpy aluminum pie plate!

Fruit added to the prepared crust

Custard added (and overflowing!)
Bake at 350 degrees for about 50 minutes.  Cover the crust edge if necessary to allow the custard to set.  Allow to cool.

Serve at room temperature or chilled.  Refrigerate any leftover.  Don't worry, it won't last long!

Saturday, August 4, 2012

Summertime Smorgasbord

Time to catch up and let you know that I haven't fallen in!  I've been busy with several projects lately, but nothing seemed newsworthy by itself.  So here are a few things that have been in the hopper...

Civil War Blocks


Randy at the Barrister's Block took July off from her Sow-a-Long, so there weren't all those blocks to cut and piece.  I used the time to finish up the twelve Double Monkey Wrench blocks for the Civil War block swap at Pieceful Quilting.


 I put them together to see how they looked, and I really liked them!  The blue and white HSTs in the corners come together to make a square-in-a-square across the blocks.  I neglected to take a photo, but here's a digital mock-up to give you the idea.


When I first started putting the blocks together, I never noticed that three of the five fabrics were directional!  And one (the blue one) was "one way only"  :-(

In the end, I had to put all the pieces up on my design wall and try to make sure that everything in a single block was going the same way.  This would be such a simple block to sew, but I had to keep every piece organized so the blocks came together.


But you know what?  One of the things I love about quilting is learning how to see, how to figure things out, and how to punt when necessary.


The last four blocks I made came out way small (1/4" overall for the block) -- I don't know why.  I re-sewed them and they were OK, but the seams are so narrow!   I almost decided just to keep the blocks, but finally took them into the store for the swap.  Fortunately, they didn't check the backs of the blocks or notice that they weren't all exactly the same.  Each participant will get 12 different blocks back in September.  I can hardly wait to see them!


Simple Sampler

The block for the July Simple Sampler class was a little pinwheel.  After ripping and resewing the last four Civil War blocks, it was nice to have something easy!


Fireplace Mosaic

Preparing my mosaic quilt is turning out to be much more of a challenge than I'd expected!  According to the project map, I need 20 different colors of fabric, and the range isn't very great -- mostly in the brown/orange/red area.  I selected a lot of scrap pieces, but also dug into my yardage and bought some fat quarters when I needed a lot of one color.  I guess the quilt will be "semi-scrappy"!  First I had to pull all the fabrics that I thought I'd want to use and marked them with the letter from the project map.

Brown, rust, dark red, orange-red, orange, ack!
Then I cut things into 2" squares and made sure I had enough of each color.  The grid is 30x30, so I figured I needed about 900 squares.

BUT!  Some of the grid squares are half square triangles.  This created two complications.  First, I had to figure out all the triangle pairs and pull out the squares that would be used for triangles.  This took some serious tracking skills -- if there's only one red/black triangle, then there will be 1/2 of a red square and 1/2 of a black square left over.  If there are 3 red/yellow triangles, then I can use the leftover 1/2 red from the red/black for the red/yellow.  Are there any extra yellow triangles anywhere?  Arghhh!


The second complication was that I'd forgotten to account for the triangles until I'd cut the fabric.  So the HSTs would be less than 2" when sewn.  After some cogitation, I realized that the quilt would be too big if I used 1/4" seams.  I'd planned on a 20x20 grid, which would have given me a 30" quilt (minus borders).  But with a 30x30 grid the quilt would be 45" -- way too big.  With 1/2" seams it will be the 30" that I'd planned and they will easily catch the HSTs.  Yes!  There will be fabric waste from the full squares, but that's acceptable to me.

One Last Thing


Last week was the 6th Annual Island Shop Hop here on the east end of Long Island.  I got to some shops I hadn't been to and picked up lots of bargains in fabric.  And it was a great opportunity to discover the difference in fabric lines among the various shops.  One was almost all batiks, beautiful but not in my plans for my next few quilts.  I didn't get to the shop that was furthest away but apparently others weren't so distance-challenged.  The grand prize winner of a new Bernina sewing machine was someone from Brooklyn!